集群模式安装
集群模式安装
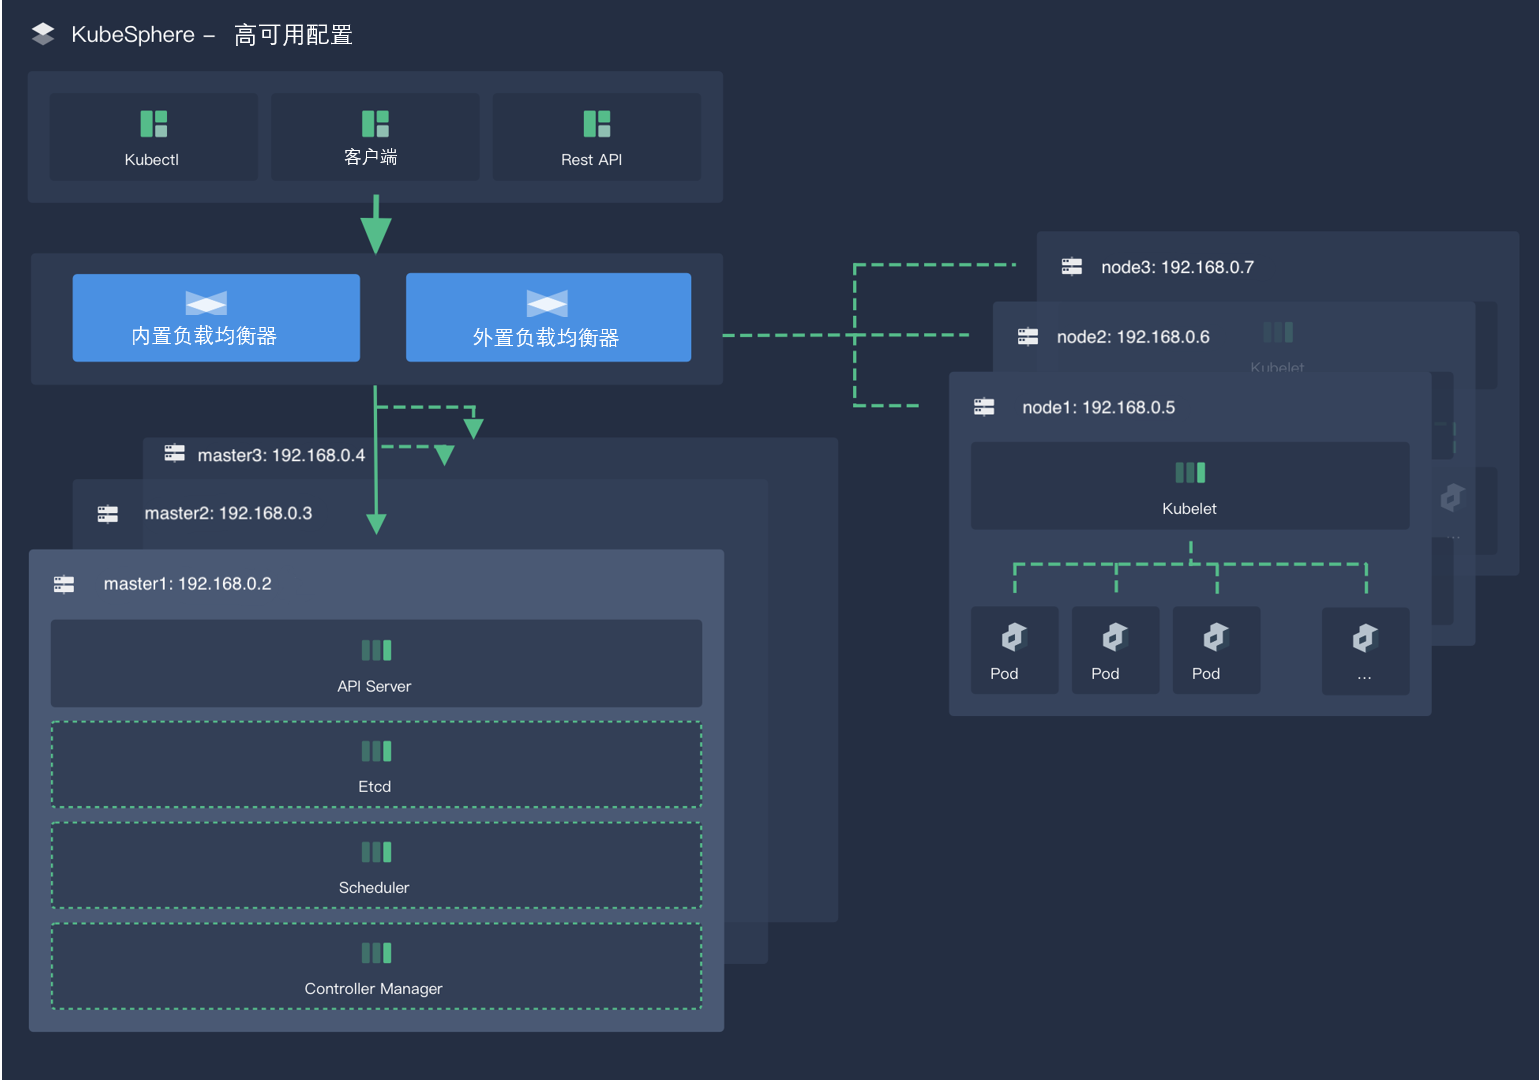
针对生产环境,需要搭建高可用性集群。避免关键组件(例如 kube-apiserver、kube-scheduler 和 kube-controller-manager)主节点宕机导致Kubernetes 和 KubeSphere 不可用。 因此,需要为多个主节点配置负载均衡器,以创建高可用集群。
本章节演示使用Nginx负载均衡搭建高可用集群。(也可以使用云负载均衡器、硬件负载均衡器、Keepalived、HAproxy等)
架构

服务器规划
- 搭建2节点的负载均衡集群
- 搭建6节点的容器集群,其中3台作为管理节点,3台作为工作节点运行应用服务容器
| 角色 | IP(示例) | 配置 | 备注 |
|---|---|---|---|
| vip | 192.168.0.1 | 独立的ip地址 | |
| nginx1 | 192.168.0.2 | 4核CPU,8G内存,100G硬盘 | 搭建负载均衡集群 |
| nginx2 | 192.168.0.3 | 4核CPU,8G内存,100G硬盘 | 搭建负载均衡集群 |
| master1 | 192.168.0.4 | 16核CPU,32G内存,500G硬盘 | 容器集群管理节点 |
| master1 | 192.168.0.5 | 16核CPU,32G内存,500G硬盘 | 容器集群管理节点 |
| master1 | 192.168.0.6 | 16核CPU,32G内存,500G硬盘 | 容器集群管理节点 |
| node1 | 192.168.0.7 | 16核CPU,32G内存,500G硬盘 | 容器集群工作节点 |
| node2 | 192.168.0.8 | 16核CPU,32G内存,500G硬盘 | 容器集群工作节点 |
| node3 | 192.168.0.9 | 16核CPU,32G内存,500G硬盘 | 容器集群工作节点 |
步骤 1:搭建Nginx负载均衡
具体搭建参考:在Linux上搭建Nginx负载均衡集群
安装完成后,配置/etc/nginx/nginx.conf,在最下面增加如下内容(主备节点保持一致):
#ip地址根据实际环境修改
stream {
    upstream k8s-apiserver {
        server 192.168.0.4:6443;
        server 192.168.0.5:6443;
        server 192.168.0.6:6443;
    }

    upstream ks-console {
        server 192.168.0.4:30880;
        server 192.168.0.5:30880;
        server 192.168.0.6:30880;
    }

    server {
        listen 6443;
        proxy_pass k8s-apiserver;
    }

    server {
        listen 30880;
        proxy_pass ks-console;
    }
}
步骤 2:准备 Linux 机器
硬件推荐配置
CentOS 7.x 8 核 CPU,16 GB 内存,40 GB 磁盘空间
节点要求
- 节点必须能够通过 SSH 连接。
- 节点上可以使用 sudo/curl/openssl 命令。
- 建议您的操作系统处于干净状态(不安装任何其他软件),否则可能会发生冲突。
容器运行时
必须有一个可用的容器运行时。KubeKey 会默认安装最新版本的 Docker。或者也可以在创建集群前手动安装 Docker。 版本要求:Docker 19.3.8 +
依赖项要求
KubeKey 可以将 Kubernetes 和 KubeSphere 一同安装。针对不同的 Kubernetes 版本,需要安装的依赖项可能有所不同。您可以参考以下列表,查看是否需要提前在节点上安装相关的依赖项。
| 依赖项 | Kubernetes 版本 ≥ 1.18 | Kubernetes 版本 < 1.18 |
|---|---|---|
| socat | 必须 | 可选但建议 |
| conntrack | 必须 | 可选但建议 |
| ebtables | 可选但建议 | 可选但建议 |
| ipset | 可选但建议 | 可选但建议 |
依赖项安装方式:
yum -y install socat conntrack ebtables ipset网络和 DNS 要求
- 请确保 /etc/resolv.conf 中的 DNS 地址可用,否则,可能会导致集群中的 DNS 出现问题。
- 如果您的网络配置使用防火墙规则或安全组,请务必确保基础设施组件可以通过特定端口相互通信。建议您关闭防火墙。
步骤 2:下载 KubeKey
下载地址:https://github.com/kubesphere/kubekey/releases
步骤 3:开始安装
将下载的 KubeKey 和制品 artifact 通过 U 盘等介质拷贝至离线环境安装节点。
执行以下命令创建离线集群配置文件:
./kk create config --with-kubesphere v3.4.1 --with-kubernetes v1.23.15 -f config-sample.yaml执行以下命令修改配置文件:
vim config-sample.yaml注意
- 按照实际离线环境配置修改节点信息。
- 必须指定 registry 仓库部署节点(用于 KubeKey 部署自建 Harbor 仓库)。
- registry 里必须指定 type 类型为 harbor,否则默认安装 docker registry。
apiVersion: kubekey.kubesphere.io/v1alpha2

kind: Cluster

metadata:

  name: sample

spec:

  hosts:

  - {name: master, address: 192.168.0.3, internalAddress: 192.168.0.3, user: root, password: "<REPLACE_WITH_YOUR_ACTUAL_PASSWORD>"}

  - {name: node1, address: 192.168.0.4, internalAddress: 192.168.0.4, user: root, password: "<REPLACE_WITH_YOUR_ACTUAL_PASSWORD>"}


  roleGroups:

    etcd:

    - master

    control-plane:

    - master

    worker:

    - node1

    # 如需使用 kk 自动部署镜像仓库,请设置该主机组 (建议仓库与集群分离部署,减少相互影响)

    registry:

    - node1

  controlPlaneEndpoint:

    ## Internal loadbalancer for apiservers

    # internalLoadbalancer: haproxy


    domain: lb.kubesphere.local

    address: ""

    port: 6443

  kubernetes:

    version: v1.23.15

    clusterName: cluster.local

  network:

    plugin: calico

    kubePodsCIDR: 10.233.64.0/18

    kubeServiceCIDR: 10.233.0.0/18

    ## multus support. https://github.com/k8snetworkplumbingwg/multus-cni

    multusCNI:

      enabled: false

  registry:

    # 如需使用 kk 部署 harbor, 可将该参数设置为 harbor,不设置该参数且需使用 kk 创建容器镜像仓库,将默认使用docker registry。

    type: harbor

    # 如使用 kk 部署的 harbor 或其他需要登录的仓库,可设置对应仓库的auths,如使用 kk 创建的 docker registry 仓库,则无需配置该参数。

    # 注意:如使用 kk 部署 harbor,该参数请于 harbor 启动后设置。

    #auths:

    #  "dockerhub.kubekey.local":

    #    username: admin

    #    password: Harbor12345

    # 设置集群部署时使用的私有仓库

    privateRegistry: ""

    namespaceOverride: ""

    registryMirrors: []

    insecureRegistries: []

  addons: []
执行以下命令安装镜像仓库:
./kk init registry -f config-sample.yaml -a kubesphere.tar.gz注意
命令中的参数解释如下:
- config-sample.yaml 指离线环境集群的配置文件。
- kubesphere.tar.gz 指源集群打包出来的 tar 包镜像。
创建 Harbor 项目。
备注
由于 Harbor 项目存在访问控制(RBAC)的限制,即只有指定角色的用户才能执行某些操作。如果您未创建项目,则镜像不能被推送到 Harbor。Harbor 中有两种类型的项目:
- 公共项目(Public):任何用户都可以从这个项目中拉取镜像。
- 私有项目(Private):只有作为项目成员的用户可以拉取镜像。 Harbor 管理员账号:admin,密码:Harbor12345。Harbor 安装文件在 /opt/harbor , 如需运维 Harbor,可至该目录下。
方法 1:执行脚本创建 Harbor 项目。 a. 执行以下命令下载指定脚本初始化 Harbor 仓库:
curl -O https://raw.githubusercontent.com/kubesphere/ks-installer/master/scripts/create_project_harbor.shb. 执行以下命令修改脚本配置文件:
vim create_project_harbor.sh#!/usr/bin/env bash
# Copyright 2018 The KubeSphere Authors.
#
# Licensed under the Apache License, Version 2.0 (the "License");
# you may not use this file except in compliance with the License.
# You may obtain a copy of the License at
#
# http://www.apache.org/licenses/LICENSE-2.0
#
# Unless required by applicable law or agreed to in writing, software
# distributed under the License is distributed on an "AS IS" BASIS,
# WITHOUT WARRANTIES OR CONDITIONS OF ANY KIND, either express or implied.
# See the License for the specific language governing permissions and
# limitations under the License.
url="https://dockerhub.kubekey.local" #修改url的值为https://dockerhub.kubekey.local
user="admin"
passwd="Harbor12345"
harbor_projects=(library
kubesphereio
kubesphere
argoproj
calico
coredns
openebs
csiplugin
minio
mirrorgooglecontainers
osixia
prom
thanosio
jimmidyson
grafana
elastic
istio
jaegertracing
jenkins
weaveworks
openpitrix
joosthofman
nginxdemos
fluent
kubeedge
openpolicyagent
)
for project in "${harbor_projects[@]}"; do
echo "creating $project"
curl -u "${user}:${passwd}" -X POST -H "Content-Type: application/json" "${url}/api/v2.0/projects" -d "{ \"project_name\": \"${project}\", \"public\": true}" -k #curl命令末尾加上 -k
done备注
修改 url 的值为 https://dockerhub.kubekey.local。
需要指定仓库项目名称和镜像列表的项目名称保持一致。
脚本末尾 curl 命令末尾加上 -k。
c. 执行以下命令创建 Harbor 项目:
chmod +x create_project_harbor.sh
./create_project_harbor.sh
方法 2:登录 Harbor 仓库创建项目。将项目设置为公开以便所有用户都能够拉取镜像。
再次执行以下命令修改集群配置文件:
vim config-sample.yaml ...
registry:
type: harbor
auths:
"dockerhub.kubekey.local":
username: admin
password: Harbor12345
privateRegistry: "dockerhub.kubekey.local"
namespaceOverride: "kubesphereio"
registryMirrors: []
insecureRegistries: []
addons: []相关信息
新增 auths 配置增加 dockerhub.kubekey.local 和账号密码。 privateRegistry 增加 dockerhub.kubekey.local。 namespaceOverride 增加 kubesphereio。
执行以下命令安装 KubeSphere 集群:
./kk create cluster -f config-sample.yaml -a kubesphere.tar.gz --with-packages参数解释如下:
- config-sample.yaml:离线环境集群的配置文件。
- kubesphere.tar.gz:源集群打包出来的 tar 包镜像。
- --with-packages:若需要安装操作系统依赖,需指定该选项。
执行以下命令查看集群状态:
kubectl logs -n kubesphere-system $(kubectl get pod -n kubesphere-system -l 'app in (ks-install, ks-installer)' -o jsonpath='{.items[0].metadata.name}') -f安装完成后,您会看到以下内容:
**************************************************

#####################################################

###              Welcome to KubeSphere!           ###

#####################################################


Console: http://192.168.0.3:30880

Account: admin

Password: P@88w0rd


NOTES:

1. After you log into the console, please check the

monitoring status of service components in

the "Cluster Management". If any service is not

ready, please wait patiently until all components

are up and running.

1. Please change the default password after login.


#####################################################

https://kubesphere.io             2022-02-28 23:30:06

#####################################################
通过 http://{IP}:30880 使用默认帐户和密码 admin/P@88w0rd 访问 KubeSphere 的 Web 控制台。