# 单体登录★
登录就是用户通过输入用户信息来获取访问系统的权限。目前登录支持两种类型。 后端通过编辑配置文件中hos-security:oauth2:enable的值来实现表单和单点登录的切换。
hos-security:
  oauth2:                                               #统一认证oauth2登录配置
    enable: false
前端可以通过修改environment.js文件下的配置项isForceLocalLogin为true来强制开启单体登录
isForceLocalLogin: true // 是否强制使用单体登录,后端服务出现故障时手动开启
# 表单登录★
# 简版
简版只需要输入登录相关数据即可登录

# 精简版
精简版除了需要输入登录相关数据外,还需要选择人员定岗数据才能登录(系统自己维护人员定岗数据)

# 专业版
专业版除了需要输入登录相关数据外,还需要选择岗位单元数据才能登录(岗位单元数据来源于资源计划排班系统)

# 单点登录
- 编辑resources目录下的applicaiton-dev.yml
注意:基础平台版本在:R2.6.6.3.34之前的配置,需要前后端地址通过nginx代理, 例如:前端:https://114.251.235.9:8323 后端:https://114.251.235.9:8323/api
hos-security:
  front-url: https://114.251.235.9:8323                  #应用前端根目录,如果不是vue框架,配置到存放hos框架的根目录
  authentication-uri: https://117.107.157.46:8129             #统一认证前端根目录,具体以实际情况配置
  oauth2:                                               #统一认证oauth2登录配置
    enable: true                                        #是否开启统一认证登录
    state-expire-in: 600                                #oauth2登录中state的有效时间,单位:秒
    client:                                             #统一认证登录配置
      registration:
        messaging-client-oidc:
          provider: spring                              #对应下边 provider 的配置,不需要修改
          client-id: messaging-client                   #统一用户平台中创建应用的id
          client-secret: secret                         #统一用户平台中创建应用的秘钥
          authorization-grant-type: authorization_code  #认证类型,不要修改
          redirect-uri: ${hos-security.front-url}/api/security/login/oauth2/code/messaging-client-oidc  #回调地址,不要修改
          scope: openid                                #统一用户平台中创建应用的作用域
          client-name: hos-app                          #该客户端名称
      provider:
        spring:
          issuer-uri: ${hos-security.authentication-uri}/api                      #发行地址
          authorization-uri: ${hos-security.authentication-uri}/oauth/authorize   #获取授权码页面
如果前后端地址没有映射关系,需要升级基础平台版本到R2.6.6.3.34或者之后的版本,并进行如下配置:
hos-security:
  front-url: https://114.251.235.9:8323                  #应用前端根目录,如果不是vue框架,配置到存放hos框架的根目录
  backend-url: http://114.251.235.9:8328/mapi                  #本应用系统后端根目录,具体以实际情况配置
  authentication-uri: https://117.107.157.46:8129             #统一认证前端根目录,具体以实际情况配置
  oauth2:                                               #统一认证oauth2登录配置
    enable: true                                        #是否开启统一认证登录
    state-expire-in: 600                                #oauth2登录中state的有效时间,单位:秒
    client:                                             #统一认证登录配置
      registration:
        messaging-client-oidc:
          provider: spring                              #对应下边 provider 的配置,不需要修改
          client-id: messaging-client                   #统一用户平台中创建应用的id
          client-secret: secret                         #统一用户平台中创建应用的秘钥
          authorization-grant-type: authorization_code  #认证类型,不要修改
          redirect-uri: ${hos-security.backend-url}/security/login/oauth2/code/messaging-client-oidc  #回调地址,不要修改
          scope: openid                                #统一用户平台中创建应用的作用域
          client-name: hos-app                          #该客户端名称
      provider:
        spring:
          issuer-uri: ${hos-security.authentication-uri}/api                      #发行地址,统一认证后端地址
          authorization-uri: ${hos-security.authentication-uri}/oauth/authorize   #获取授权码页面,统一认证前端地址
# 登录配置★
# token 配置
hos-security:
  login:                                                #登录相关配置
    token:                                              #token相关配置
      access-token-expires-in: 3000                      #访问token过期时间,单位:秒
      sign-key: 123123                                  #生成jwt token 签名key
      access-token-key: access_token                    #保存token缓存的前缀
参数说明:
| 参数名称 | 参数说明 | 备注 |
|---|---|---|
| access-token-expires-in | 访问token过期时间 | 单位:秒,默认259200秒(3天)。 |
| sign-key | 生成jwt token 签名key | 集群模式下,需要各个服务配置相同的签名key |
| access-token-key | 保存token缓存的前缀 | 默认:hos_access_token |
提示
岗位过期时间大于配置的访问token过期时间:当用户岗位配置了岗位过期时间,则token过期时间与岗位过期时间一致,当未配置岗位过期时间时,token过期时间与yml配置文件一致。
# 登录日志配置
hos-security:
  login:                                              #登录相关配置
    log:
      policy: sync                                    #登录日志记录策略 sync:同步插入,async:异步插入
      async-size: 1000                                #日志异步插入时,批量插入的条数
      async-cron: 0/30 * * * * ?                      #日志异步插入时,多长时间清理一次
参数说明:
| 参数名称 | 参数说明 | 备注 |
|---|---|---|
| policy | 登录日志记录策略 | sync:同步插入,async:异步插入。默认同步插入 |
| async-size | 日志异步插入时,批量插入的条数 | 当policy=async生效,默认2000 |
| async-cron | 日志异步插入时,多长时间清理一次 | 当policy=async生效,默认0/30 * * * * ? |
提示
日志记录策略分为同步插入和异步插入。同步插入即为用户登录成功时立即插入日志。当登录并发量较大时同步插入登录日志会给数据库带来很大压力 从而影响其他主业务流程,为了解决这个问题我们提供了异步插入的机制。当开启异步插入时,触发批量插入的条件是配置的async-cron时间段内日志 条数达到async-size或者每隔async-cron时间段触发。由于异步记录在日志入库之前是在服务内存中存放的,所以当服务宕机时可能会有部分日志丢失 ,请注意。
# 接口跳过token续期
一般项目要求用户一段时间不操作,跳转到登录页。所以当接口访问HOS应用系统时,如果用户已经登录,则会在接口调用系统时续期用户登录token。 但是有的接口并不是用户操作才会调用的,比如前端定时轮训调用后端接口或者websocket接口等,都会导致token续期。这肯定不符合业务需求。 所以需要配置这些接口跳过token续期。
配置如下:
framework:
  security:
    renewal:
      ignores:
        - /websocket/heartbeat
        - /user/info
# 认证白名单配置
访问系统的接口绝大多数接口都需要用户认证,不需要用户认证的接口需要配置到白名单中。配置白名单分为两种方式。推荐使用方式一配置,可以简化yml文件中的配置显得更简洁。
# 方式一
在每个模块或者项目的resources/META-INF文件夹下创建hos-security.factories文件,换行使用,\。然后按照如下格式编辑hos-security.factories文件。
security-white=\
/open/resource/info,\
/openApi/*,\
/test
# 方式二
在项目启动yml文件中配置白名单
hos-security:
  login:
    white-list:                                        #认证白名单
      - /open/resource/info                             #示例仅供参考
      - /openApi/*
      - /test
# 配置security白名单
找到SecurityLoginConfig类或者配置SecurityFilterChain的类,配置跳过认证。

@Bean
    @Order(value = Ordered.HIGHEST_PRECEDENCE + 100)
    SecurityFilterChain securityFilterChain(HttpSecurity http, HosSecurityProperties hosSecurityProperties, HosPostInfoService hosPostInfoService) throws Exception {
        // 配置白名单(加载yml和hos-security.factories配置的白名单)
        List<String> whiteList = SecurityUtil.getWhiteList(hosSecurityProperties.getLogin().getWhiteList());
        http
                .authorizeHttpRequests(authorize ->
                        authorize
                                .antMatchers(whiteList.stream().toArray(String[]::new)).permitAll()
                                .anyRequest().authenticated()
                );
        ......
        return http.build();
    }
# 获取登录用户信息
登录token中存储了登录相关的信息,框架提供了获取登录信息的AccountUtil工具类,工具类里面提供了获取账号id、登录名、租户、岗位id、岗位名称、登录全局唯一标识方法,
用户尽量使用以上提供的方法,如果现有方法不满足用户使用,也可以通过调用获取token对象或者用户对象接口进行相关数据的获取。
AccountUtil提供的具体方法如下:
- 获取登录用户账号id
/**
 * 获取登录用户账号id
 * 对应账号表hos_user_account的id字段值
 * @return
 */
public static String getAccountId();
- 获取登录名
 /**
 * 获取登录名
 * 对应账号表hos_user_account的code字段值
 * @return
 */
public static String getAccountCode();
- 获取登录用户的租户Id
 /**
 * 获取登录用户的租户Id
 * 对应账号表hos_user_account的tenant_id字段值
 **/
public static String getTenantId();
- 获取当前登录用户对象
  /**
 * 获取当前登录用户对象
 **/
 public static HosUser getLoginUser();
HosUser对象属性说明:
| 属性名称 | 属性说明 | 备注 |
|---|---|---|
| accountCode | 账号code | |
| accountId | 账号id | |
| accountName | 账号名称 | |
| phoneNumber | 手机号 | |
| userName | 账号名称 | |
| password | 账号密码 | 为空 |
| tenantId | 租户id | |
| activity | 是否启用 | |
| locked | 是否锁定 | |
| unlockDate | 解锁时间 | |
| lastLoginDate | 上次登录时间 | |
| lastUpdatePassword | 上次更新密码时间 | |
| needRestPassword | 是否需要修改密码 | |
| loginDate | 登录时间 | |
| globalUniqueID | 本次登录状态的全局唯一id | |
| personId | 唯一标识码 | |
| startDate | 开始日期 | |
| endDate | 结束日期 | |
| postOneVO | 岗位对象 | |
| postId | 开始日期 | |
| postName | 结束日期 | |
| caInfo | ca认证信息 | 记录登录时的CA认证信息 |
- 获取登录token对象
 /**
 * 获取登录token对象
 * @return
 */
public static HosTokenAuthenticationToken getToken();
HosTokenAuthenticationToken对象属性说明:
| 属性名称 | 属性说明 | 备注 |
|---|---|---|
| details | 客户端信息 | 记录ip、mac、浏览器、操作系统、主机名称 |
| authenticated | true | 是否认证成功 |
| uniqueKey | 本地登录的全局唯一id | |
| credentials | 登录信息记录 | 客户端信息、登录方式、登录传参信息 |
| principal | HosUser对象 | 登录用户信息 |
| accessToken | HosAccessToken对象 | 包含tokenValue、开始时间、结束时间、tokenType、uniqueKey |
| name | 登录名 |
- 设置认证信息
/**
 * 设置认证信息
 * @return
 */
public static void setAuthentication(Authentication authentication);
- 获取认证信息
/**
 * 获取认证信息
 * @return
 */
public static Authentication getAuthentication();
Authentication对象属性说明:
| 属性名称 | 属性说明 | 备注 |
|---|---|---|
| details | 客户端信息 | 记录ip、mac、浏览器、操作系统、主机名称 |
| authenticated | true | 是否认证成功 |
| credentials | 登录信息记录 | 客户端信息、登录方式、登录传参信息 |
| principal | HosUser对象 | 登录用户信息 |
- 获取登录全局唯一变量id
/**
 * 获取登录全局唯一变量id
 * @return
 */
public static String getGlobalUniqueID();
- 获取岗位id
/**
 * 获取岗位id
 * @return
 */
public static String getPostId();
- 获取岗位名称
/**
 * 获取岗位名称
 * @return
 */
public static String getPostName();
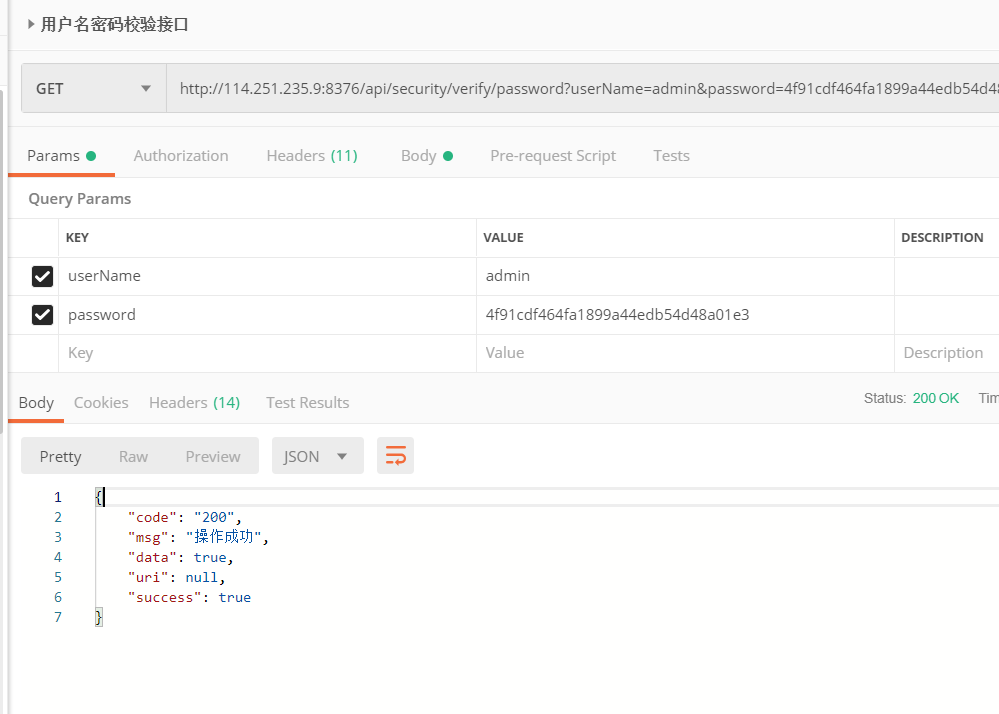
# 用户名密码校验接口
为满足应用系统的业务需求,提供接口验证密码是否和账号表里面的密码一致
接口地址:http://ip:port/应用程序的根路径/security/verify/password 请求类型为get
使用接口测试工具,以postman举例:
提示
ip、port、应用程序的根路径需要根据实际配置修改,/security/verify/password是接口固定地址。接口入参:
| 参数 | 值 | 说明 |
|---|---|---|
| userName | 登录名 | 必要参数 |
| password | 密码 | 必要参数;前端crypt加密方式加密后的密码 |
- 返回参数说明:
| 参数名称 | 参数说明 | 备注 |
|---|---|---|
| code | 状态码 | 成功为200 |
| msg | 提示信息 | 成功为success |
| data | 结果 | 校验结果,校验成功返回true,否则返回false |
| success | 是否调用成功 | 调用成功返回true |
# 判断登录token是否失效
pom文件添加hos-security-config.jar包依赖
新增根据传入token、uniqueKey参数判断对应的登录token是否有效的api接口:
接口格式
public interface HosValidTokenApi {

    @PostMapping("/validToken")
    Boolean validToken(@Validated @RequestBody Object params);

}
入参json格式:
{
    "token": "登录token",
    "uniqueKey": "唯一标识"
}
返回值:布尔值,true表示token有效,false表示token失效。
false
# 切换岗位前调用业务处理方法
1、现在切换岗位前会先调用SwitchPostBusinessService的所有实现类的business方法,业务系统可以实现自己的业务处理方法,进行业务处理。当 业务系统的接口调用完成后,才会继续进行后续的切换岗位操作。 2、当该SwitchPostBusinessService有多个实现类时,会按照实现类的顺序进行调用
public interface SwitchPostBusinessService {

    void business();

}
# 免密认证源登录★★
免密认证源登录就是用户无感知访问第三方应用系统。
传统免密登录源系统访问目标系统时会在URL链接上携带用户名信息,这种方式非常不安全。所以HOS免密登录采用了源系统生成临时token,
目标系统收到token之后,调用源系统获取用户信息接口返回当前用户信息,目标系统接收到用户信息之后登录的方式,避免了用户信息的泄露。
下面以OA系统免密登录HRP系统为例说明HOS免密登录流程以及配置。
# 免密认证流程
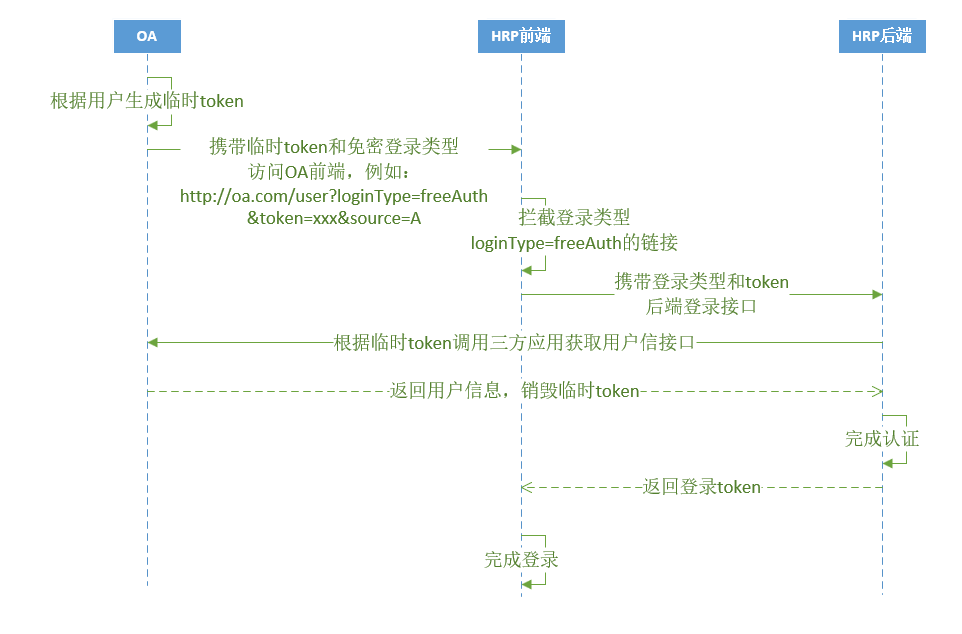
免密认证流程描述
(1)OA系统根据用户信息生成临时token。
(2)OA系统将生成临时token和登录类型loginType(固定值为freeAuth)、和来源source(双方系统约定好,用于区别免密访问的源系统)拼接到URL的query参数中;另外,如果业务系统是精简版而且要实现以指定岗位免密登录系统,需要新增参数 buUnitCode(业务单元编码)、buPostCode(业务岗位编码),如果业务系统是专业版而且要实现以指定岗位免密登录系统,需要新增参数 unitType(岗位单元类型)、unitId(岗位单元 id)
(3)浏览器跳转或打开以上生成的URL。
(4)HRP系统前端根据loginType=freeAuth进行拦截
(5)HRP系统获取OA系统生成的token,然后调用OA系统验证token的接口。
(6)OA系统验证成功,返回用户信息。
(7)HRP系统拿到用户信息之后本系统登录。
# 免密认证配置
# 源系统配置
以OA系统免密登录HRP系统为例,源系统则为OA系统。如果OA系统时基于HOS基础开发框架开发的,并且通过菜单打开HRP系统(目标系统)则需要在 相应的菜单中配置要方位HRP系统的URL地址,开启外链以及开启免密登录同时配置来源(双方系统约定好的来源)。

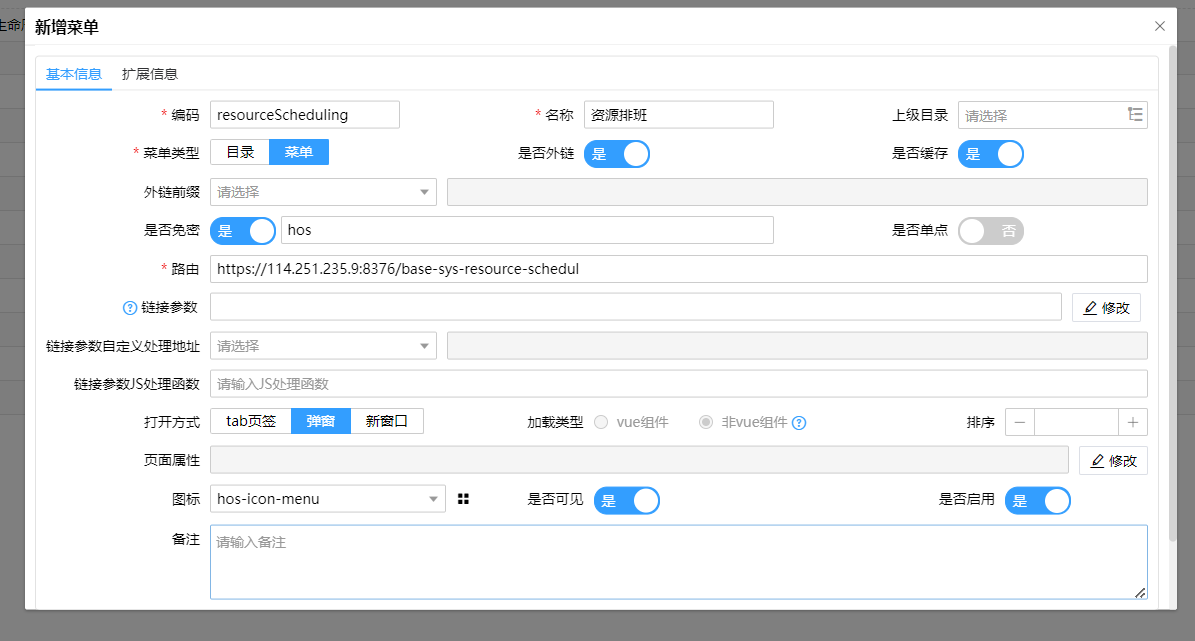
提示
路由:第三方应用系统页面的访问地址
是否外链:开启
是否免密:开启
认证源编码:第三方系统提供认证源编码,本示例的该值是OA
# 获取临时token接口
第三方系统需要提供一个根据当前用户生成临时token
接口地址:http://{应用系统前端ip和端口}/api/login/passwordFree/token
请求方式:POST
hearder参数:
| 字段信息 | 必填 | 参数说明 |
|---|---|---|
| Access-Token | 必填 | 本系统登录Token |
出参格式如下:
{
  "code": "200",
  "msg": "操作成功",
  "data": {
    "token": "h3OIoV3VUh"
  },
  "success": true
}
# 验证token获取登录用户接口
第三方系统需要提供一个接口用于验证临时免密登录token并返回登录用户名
接口地址:http://{应用系统前端ip和端口}/api/login/passwordFree/userInfo
请求方式:POST
query参数
| 字段信息 | 必填 | 参数说明 |
|---|---|---|
| token | 必填 | 临时Token |
入参接口示例如下:
https://114.251.235.9:8334/api/login/passwordFree/userInfo?token=h3OIoV3VUh
出参格式如下:
R2.6.5.3.0版本之前的返回值如下:
{
"code": 200,
"msg": "请求成功",
"data":
  {
    "data": "账号code" //需要两个系统之间的用户code完全一致,如果有统一用户的话,可以和统一用户的的账号code保持一致
  }
}
R2.6.5.3.0版本之后的返回值如下:
{
  "code": "200",
  "msg": "success",
  "data": {
    "msg": "success",
    "data": {
      "loginName": "1001",
      "post": {
        "id": "e01c09c3a2c80972b0520a2511043437",
        "type": "unit",
        "name": "关键数据岗位单元",
        "postNames": "初始化设计岗",
        "buNames": "业务孪生关键数据业务单元",
        "orgId": "a5d8c1cc099e43f8af881fe4e9a7583d",
        "orgName": "医为智慧医院",
        "personId": "762",
        "postRecords": [{
          "postSourceId": "594d5e46f60d1df0f039fc9670433f24",
          "postCode": "P-00001-BP-0001",
          "postName": "初始化设计岗",
          "buSourceId": "82758826028e7970aacb5502289cb6ee",
          "buCode": "bu-00001",
          "buName": "业务孪生关键数据业务单元",
          "ip": "",
          "children": [{
            "id": "001e767cd044db3f04b87ccd9bd91122",
            "name": "申请注册岗",
            "type": "process",
            "startTime": "2024-09-29",
            "endTime": "2034-09-30",
            "ip": ""
          }]
        }]
      }
    }
  }
}
当OA系统不是基于HOS基础平台开发的,则需要OA系统按照以上规则拼接URL参数的同时,还需要提供一个根据token获取用户信息的接口。
如果OA系统是基于HOS基础平台开发的,还需确认验证token接口是否配置了登录认证白名单。
hos-security:
  login:
    white-list:                                         #认证白名单
      - /login/passwordFree/userInfo   #免密认证源验证Token并返回用户的接口地址
# 目标系统配置
当目标系统HRP是基于HOS基础平台开发的系统时,需要打开【系统管理】->【免密登录】,新增一条配置。


提示
编码:免密访问认证源编码,本示例的该值是OA
名称:名称
是否启用:开启
验证token地址:如果OA系统基于HOS基础平台开发的则配置OA系统的/login/passwordFree/userInfo接口即可,否则需要OA系统的开发人员提供
当HRP系统不是基于HOS基础框架开发时,则需要HRP系统按照以上免密登录流程开发相应功能。
# 验证token并获取登录用户信息接口
接口地址:http://ip:port/应用程序的根路径/login/passwordFree/userInfo
请求类型为post
提示
ip、port、应用程序的根路径需要根据实际配置修改login/passwordFree/userInfo是接口固定地址。接口query入参:
| 参数 | 值 | 说明 |
|---|---|---|
| token | 临时token | 必要参数 |
- 返回参数说明:
| 参数名称 | 参数说明 | 备注 |
|---|---|---|
| code | 状态码 | 成功为200 |
| msg | 提示信息 | 成功为success |
| data | 结果 | 校验结果,校验成功返回true,否则返回false |
| loginName | 登录工号 | |
| post | 岗位信息 | 登录用户当前的岗位 |
| success | 是否调用成功 | 调用成功返回true |
- 返回参数示例:
# 测试和问题
在OA系统中点击相应的菜单或者打开相应的功能,正常情况下会成功进入第三方应用的系统页面

异常情况下,会在菜单页面显示错误信息,具体如下:

报错一:请维护免密认证源!!
解决思路:到第三方应用系统的【免密登录】模块确定是否配置了当前菜单指定的认证源,确保认证源配置的编码和验证token地址正确
报错二:freeToken无效或者异常!!
解决思路:首先到第三方应用系统的【免密登录】模块确定是否配置了当前菜单指定的认证源,确保认证源配置的验证token地址正确
另外token目前的有效期是五分钟,确定是否过期,如果过期,重新生成token
报错三:用户或人员不存在,请联系管理员
解决思路:第三方系统里面没有对应的登录用户,需要在第三方系统创建对应的用户
报错四:系统内部报错
解决思路:首先到第三方应用系统的【免密登录】模块确定是否配置了当前菜单指定的认证源,确保认证源配置的验证token地址正确,如果正确的话,联系开发人员进行bug排查
报错五:没有免密验证token接口的调用权限
解决思路:需要将验证token接口地址配置到白名单
报错六:免密验证token接口异常
解决思路:配置的验证token接口地址错误或者调用不通
# 第三方资源授权登录★★
# 第三方资源授权登录流程
第三方资源授权登录就是用户无感知访问第三方应用系统。 传统免密登录源系统访问目标系统时会在URL链接上携带用户名信息,这种方式非常不安全。所以第三方资源授权登录采用了验签方式, 目标系统收到参数之后,根据规则将参数按照一定的顺序加密生成签名,进行签名验证,避免了用户信息的泄露。 下面以OA第三方资源授权登录HRP系统为例说明第三方资源授权登录流程以及配置。
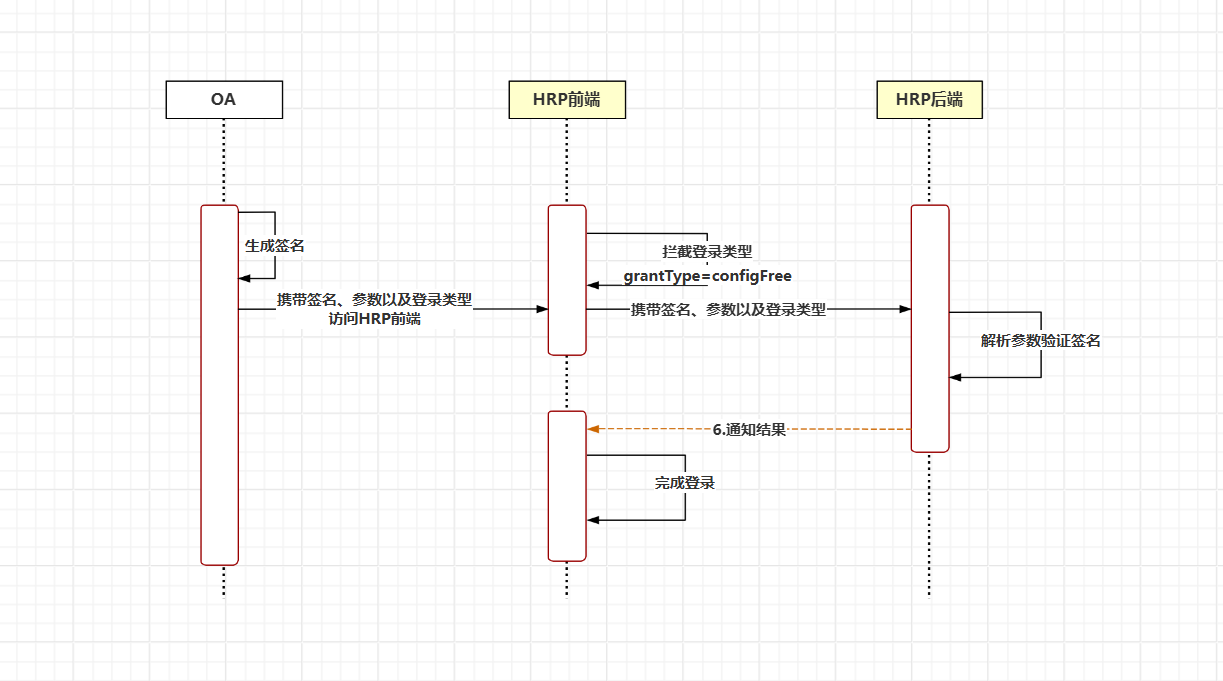
(1)OA系统根据菜单配置的参数生成签名。
(2)OA系统将生成的签名和登录类型grantType(固定值为configFree)、和第三方资源编码(authenticationSource)、登录配置代码(loginCode)、用户登录名(loginName)、业务岗位(businessPost)、业务单元(businessUnit)(双方系统约定好,用于区别免密访问的源系统)拼接到URL的query参数中
(3)浏览器跳转或打开以上生成的URL。
(4)HRP系统前端根据grantType=configFree进行拦截
(5)HRP系统根据第三方资源编码与登录配置代码获取应用秘钥,对步骤(2)参数进行加密操作。
(6)HRP验证签名,验证通过返回成功信息
(7)HRP系统拿到用户信息之后本系统登录。
# 第三方资源授权登录配置
# 源系统配置
以OA系统免密登录HRP系统为例,源系统则为OA系统。如果OA系统时基于HOS基础开发框架开发的,并且通过菜单打开HRP系统(目标系统)则需要在 相应的菜单中配置要方位HRP系统的URL地址,开启外链以及开启免密登录同时配置来源(双方系统约定好的来源)。
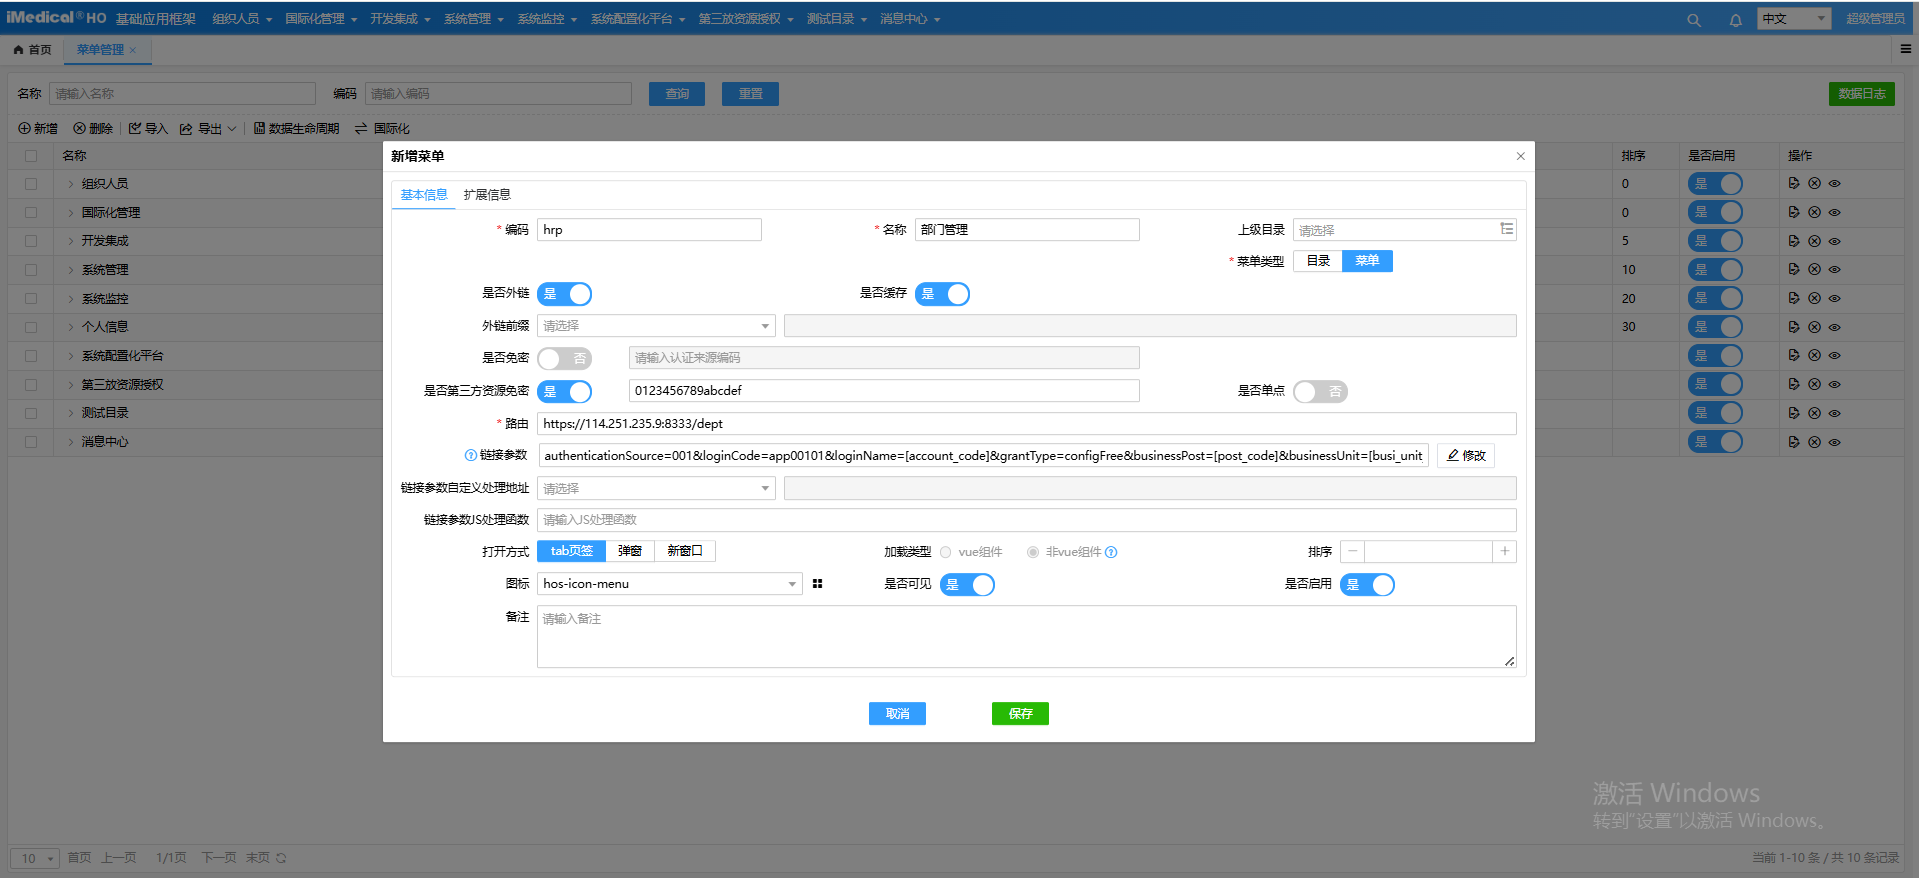
相关链接参数说明:
| 参数名称 | 属性说明 |
|---|---|
| authenticationSource | 第三方资源编码(应用SM4秘钥是资源code所对应的资源的秘钥),由被访问方提供 |
| loginCode | 第三方资源下的登录配置编码,由被访问方提供 非账号登录名 |
| loginName | 账号编码,如果为空时则默认取当前登录账号的编码 |
| grantType | 固定值configFree,可不填 |
| businessPost | 被访问方业务岗位编码 |
| businessUnit | 被访问方业务单元编码 |
提示
路由:第三方应用系统页面的访问地址
是否外链:开启
是否第三方资源免密:开启
第三方资源秘钥:第三方系统提供Sm4秘钥
# 目标系统配置
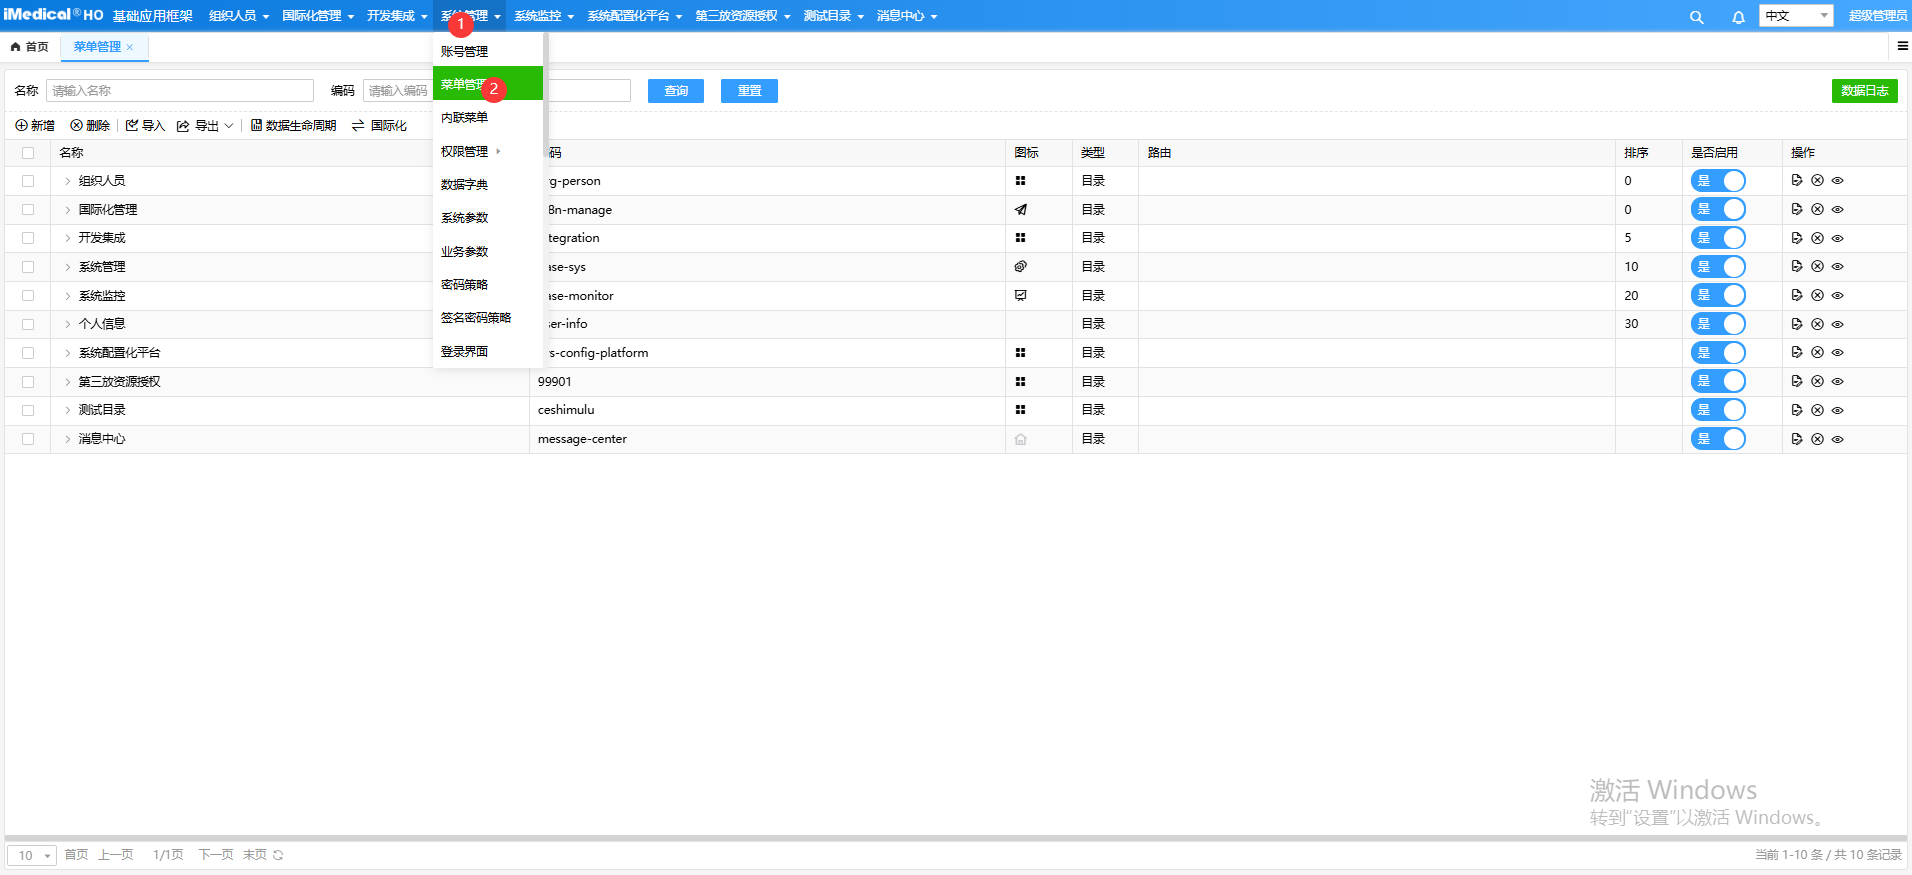
目标系统HRP系统,需要打开【系统管理】->【第三方资源授权】,新增一条配置。
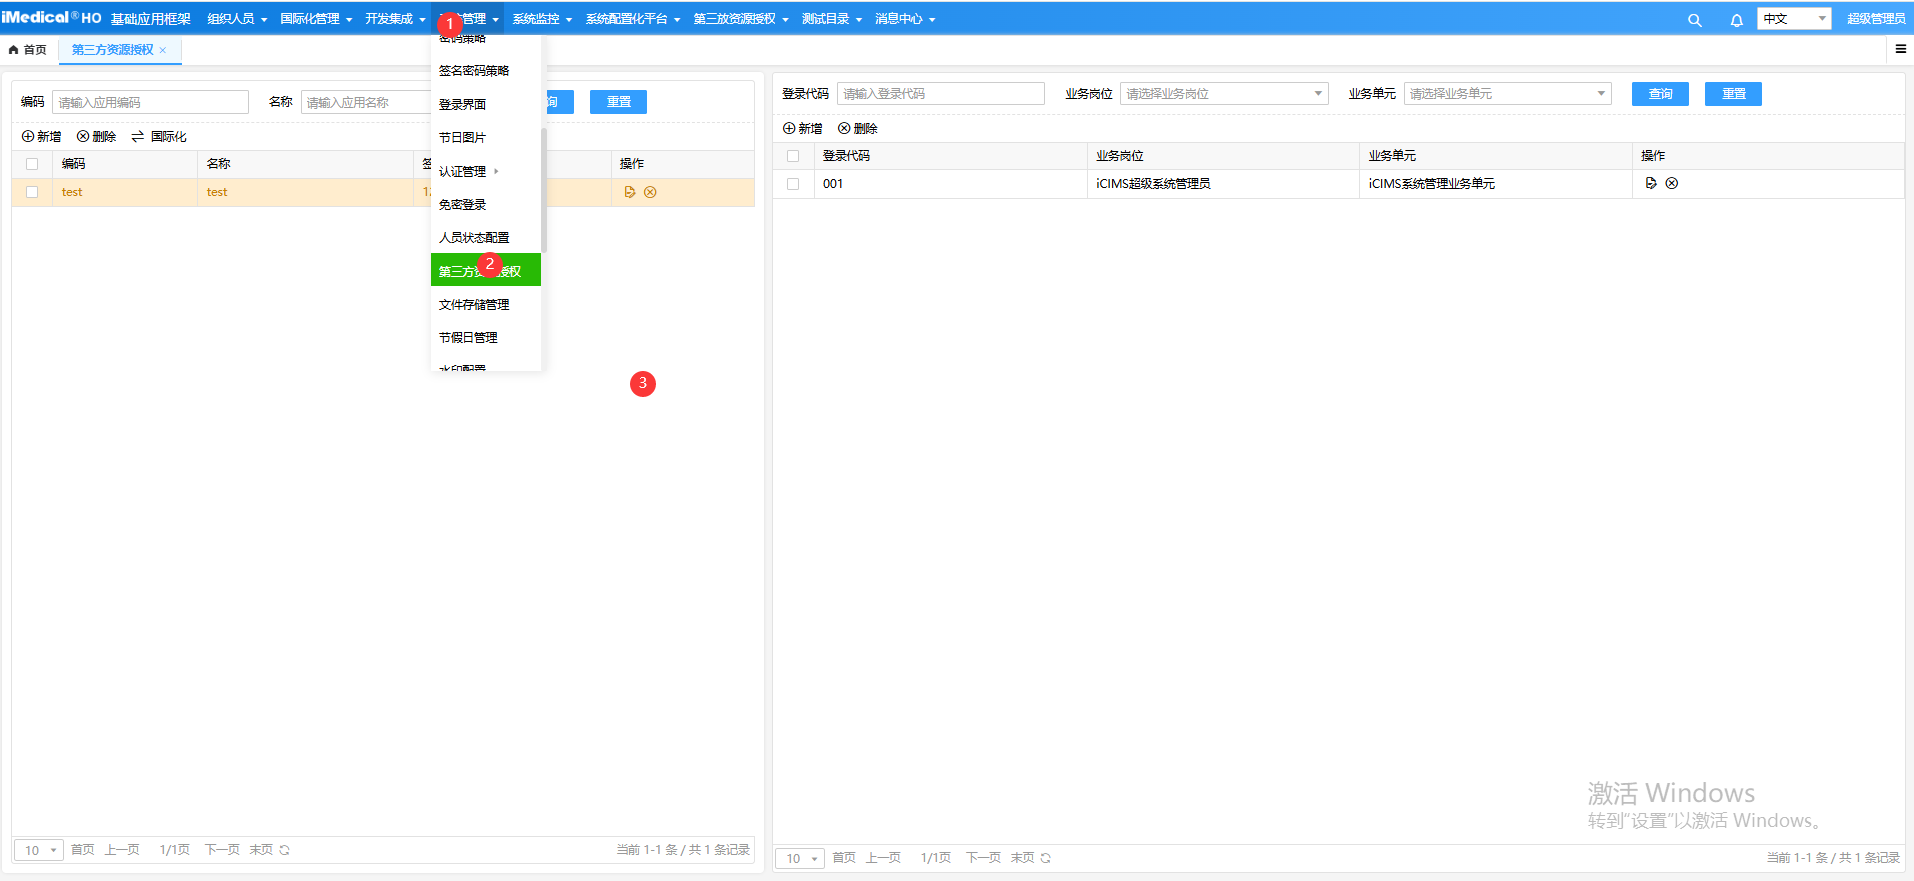
提示
目标系统必须是基于hos框架开发
此功能只适用于目标系统精简版
# 跳转规则
第三方资源授权免密登录访问逻辑如下:
1.如果只传了authenticationSource,loginCode,则以authenticationSource+loginCode去匹配岗位+业务单元与人员本身分配的岗位和业务单元无关;如果没有查到岗位数据,则会根据系统参数`free-login-null-error`来判断返回值
 为true时返回错误,为false时获取当前账号所对应人员的第一条定岗数据。

2.如果只传了businessPost,businessUnit则以businessPost+businessUnit为准去匹配岗位和业务单元,与人员定岗数据有关;如果businessPost+businessUnit无法匹配人员定岗数据,则用businessUnit去配置定岗位取第一条数据,如果businessUnit也无法匹配则会根据系统参数`free-login-null-error`来判断返回值
 为true时返回错误,为false时获取当前账号所对应人员的第一条定岗数据。

3.如果authenticationSource,loginCode,businessPost,businessUnit四个参数在打开页面时都存在值,系统会根据系统参数`open-new-free-login`来判断是以authenticationSource+loginCode为准获取岗位和业务单元还是以businessPost+businessUnit为准获取岗位+业务单元。
为true时与1逻辑一致;为false时与2一致。

4. 如果第三方资源没有维护秘钥,默认通过当前第三方资源免密登录的系统不需要验签,可直接访问。
# 问题
报错一:验签错误
解决思路:确认目标系统配置【第三方资源授权】的Sm4秘钥与源系统的Sm4秘钥是否一直
报错二:数据异常,未正确匹配到岗位信息
解决思路:确认目标系统的第三方资源授权中登录配置锁关联的业务岗位是否可以,或者人员定岗数据是否可用;确认源系统是否正确传值
报错三:账号或者密码错误
解决思路:源系统确认是否正确的配置loginName登录名参数
# 登录返回的用户信息扩展
登录成功时,系统的登录接口默认返回accessToken、hosUser(用户信息)、type(认证方式:单体或者单点认证)信息,前端会对返回的信息进行保存处理, 如果应用系统业务需要返回其他信息,可以进行登录返回信息的扩展,具体按照以下步骤进行:
# 第一步,实现TokenHandler接口类的handler方法,在该方法内实现返回信息的获取,例如:
public class HosTokenHandler implements TokenHandler {

    public Map<String, Object> handler(HosUser hosUser) {
    Map<String,Object> result = new HashMap<>();
    result.put("six", "女");
    result.put("age", "32");
    Map<String,Object> rs = new HashMap<>();
    rs.put("other", result);
    return rs;
    }
}
# 第二步,配置类增加扩展token信息处理类
找到SecurityLoginConfig配置类的securityFilterChain()方法,修改HosLoginConfigurer配置。
    @Bean
    @Order(value = Ordered.HIGHEST_PRECEDENCE + 100)
    SecurityFilterChain securityFilterChain(HttpSecurity http, HosSecurityProperties hosSecurityProperties, HosPostInfoService hosPostInfoService) throws Exception {

        ...

        // 加载登录配置
        HosLoginConfigurer hosLoginConfigurer = new HosLoginConfigurer();
        // 加载统一认证配置
        if (hosSecurityProperties.getOauth2().isEnable()) {
            hosLoginConfigurer.hosOAuth2Login();
        }
        hosLoginConfigurer.loginTokenEndpoint(loginTokenEndpoint -> {
                //注入自定义TokenHandler
                loginTokenEndpoint.tokenHandler(new HosTokenHandler());
              });
        http.apply(hosLoginConfigurer);

        ...

        return http.build();
    }
# 登录认证扩展
HOS基础框架自带用户名密码、短信验证码、CA等登录方式, 如需扩展其他登录方式,例如某医院要实现与第三方单点登录系统实现单点对接,定义登录类型为FSToken,实现步骤如下:
# 前端实现
认证扩展逻辑位于permission.js文件,文件中使用了vue-router的全局守卫函数router.beforeEach。所有对路由的变化操作都会触发该守卫,因此我们可以在路由守卫内监控参数变化,捕捉到可能进行的登录操作。
# 第一步,找到代码添加位置
permission.js 通常位于 src/sys/hos-app-base 或 /src 根目录下,如不存在,请使用全局文件搜索功能,各IDE快捷键不同,根据实际情况操作。
打开 permission.js 找到 if (to.query.grantType === 'configFree') { ..... } 或 if (to.query.token) { .....} 或 else if (to.query.token) { .....} 或 if (to.query.CASTicket) { .... } 代码块,通常位于文件的 300 行附近。在这些 ifElse elseIf 的前方或后方,添加自己的逻辑,比如:
else if (to.query.token) {
  // 已有逻辑...
  // ...
} else if(your_condition) {
  // 新的业务逻辑
} else if(to.query.CASTicket) {
  // 已有逻辑...
  // ...
}
your_condition 是触发改认证扩展的条件,可以是路由上的某个参数或某个自行定义的变量
# 第二步,添加逻辑
在自己的代码块中添加对应的逻辑, 我们已经把认证的token接口/security/token封装,如需使用可直接调用 freeLoginOA() 方法,其中grantType为必备参数。在登陆成功后的处理逻辑中,我们也进行了一些封装,方法名为 freeLoginOA_callback(),封装内容主要包括:
- 根据需要请求国际化数据
- 去除无用的query参数
- 增加登录后需要的query参数(需手动)
- 添加一次性标识用于发布登录状态全局广播
整体示例如下:
else if (to.query.your_key == your_condition) {
  /**
   * 判断是否符合your_condition
   * 登录成功继续走逻辑,登录失败跳转至error页
   */

  let loginParam = {
    grantType: 'freeAuth', //必备参数,值与后端约定
    other: '其他必要参数...'
  }
  try {
    const { code, data } = await freeLoginOA(loginParam)
    if (code == 200) {
      /**
       * 登录成功后:
       * 删除url上的判断条件,如果在iframe中加载还需删掉meta.url中的判断条件,freeLoginOA_callback内已封装
       * 用于避免意外刷新页面重复触发登录流程
       *
       * 如不使用现有逻辑,可自行编写,将 freeLoginOA_callback 调用注释即可
       */
      // 想删除的url参数,可以是数组或单字符串
      const delParams = [
        'paramsA',
        'paramsB'
      ]
      freeLoginOA_callback(to, next, delParams)
    } else {
      next({
        path: '/error',
        query: {
          code: data.code,
          msg: data.msg
        }
      })
    }
  } catch (error) {
    next({
      path: '/error',
      query: {
        code: error.code,
        msg: error.msg
      }
    })
    return
  }
}
# 第三步,测试
- 在浏览器地址栏中输入包含
your_condition的 URL 链接,例如:https://1.2.3.4:8002/path?your_condition=abcd&otherParam=1234,该链接不能带有/login字符内容,/login已被登录页占用,会被重定向到登录页。 - 查看 F12 控制台中是否发送 token 请求,例如:
https://114.251.235.9:8330/api/security/token?grantType=与后端约定,检查参数是否完备。接口是否返回了 code 为 200 的数据,例如:
{
    "code": "200",
    "msg": "操作成功",
    "data": {
        "postChainId": "dabff667ee804c8eae888aa107301362",
        "personId": "admin",
        "code": "admin",
        "name": "超级管理员"
    },
    "uri": null,
    "success": true
}
- 是否成功跳转至目标页面。
# 后端实现
# 第一步,在pom文件引入hos-security-login
<dependency>
    <groupId>com.mediway.hos</groupId>
    <artifactId>hos-security-login</artifactId>
</dependency>
# 第二步,定义登录参数类
定义登录参数类,该类继承AbstractHosLoginParam,类中定义登录属性,例如:用户名、密码、token等。
import com.mediway.hos.security.core.authentication.param.AbstractHosLoginParam;
import lombok.Data;

@Data
public class HosFSLoginParam extends AbstractHosLoginParam {

 private String token;

}
# 第三步,定义登录方式类
创建一个自定义的登录方式类,继承AbstractHosAuthenticationToken<自定义登录参数类>。在该类中定义构造函数并定义一个HosGrantType对象。 hosGrantType值是一个自定义登录方式的标识,该值是登录接口grantType传参,例如:/api/security/token?grantType=FSToken。
import com.mediway.hos.security.core.HosGrantType;
import com.mediway.hos.security.core.authentication.AbstractHosAuthenticationToken;

public class HosFSAuthenticationToken extends AbstractHosAuthenticationToken<HosFSLoginParam> {
  //必要代码
 @Override
 public Object getCredentials() {
  return null;
 }
 //必要代码
 @Override
 public Object getPrincipal() {
  return null;
 }
 //必要代码
 private HosFSAuthenticationToken() {
  super();
 }
 //必要代码
 public HosFSAuthenticationToken(HosFSLoginParam loginParam) {

  super(loginParam, new HosGrantType("FSToken"));
 }


}
# 第四步,定义登录参数转换类
创建一个自定义的登录参数转换类,该类继承AbstractHosAuthenticationConverter类。在该类中重写convert方法,将请求中的参数转换成自定义登录方式类,如有异常通过SecurityUtil.throwError(errorCode,message)抛出,异常会在登录接口里面返回。
import com.mediway.hos.security.core.HosLoginParameterNames;
import com.mediway.hos.security.core.util.JsonUtils;
import com.mediway.hos.security.core.util.SecurityUtil;
import com.mediway.hos.security.login.authorization.convert.AbstractHosAuthenticationConverter;
import org.springframework.security.core.Authentication;

import javax.servlet.http.HttpServletRequest;
import java.io.IOException;

public class HosFSAuthenticationConverter extends AbstractHosAuthenticationConverter {
 @Override
 public Authentication convert(HttpServletRequest request) {
  String grantType = request.getParameter(HosLoginParameterNames.GRANT_TYPE);
  //替换FSToken为自定义的登录方式标识
  if (!"FSToken".equals(grantType)) {
   return null;
  }
  try {
   //替换HosFSLoginParam为自定义登录参数类
   HosFSLoginParam smsLoginParam = JsonUtils.getInstance().readValue(request.getInputStream(), HosFSLoginParam.class);
   smsLoginParam.setHosGrantType(grantType);
   //替换HosFSAuthenticationToken为自定义登录方式类
   HosFSAuthenticationToken fsAuthenticationToken = new HosFSAuthenticationToken(smsLoginParam);
   return fsAuthenticationToken;
  } catch (IOException e) {
   logger.error("统一开放服务集成平台系统登录参数解析错误", e);
   //自定义错误编码、错误描述
   SecurityUtil.throwError("101-002-004-012", "统一开放服务集成平台系统登录参数解析错误");
  }
  return null;
 }
}
# 第五步,定义用户信息校验类
创建一个自定义的用户信息校验类,该类继承 AbstractHosAuthenticationProvider<自定义登录方式类>类。如有异常通过SecurityUtil.throwError(errorCode,message)抛出,异常会在登录接口里面返回
1、authenticate(Authentication authentication):必须重写,该方法用于根据认证传参进行用户验证以及Authentication对象生成。参数authentication是一个封装了
用户认证信息的类,可以转换成自定义token信息类,通过该对象可以取到登录参数,方法返回一个认证成功的Authentication对象。方法体内部包含五部分:
  第一部分:自定义登录方式类的转换(需要实现)

  第二部分:自定义的登录认证逻辑(需要实现)

  第三部分:通过登录名获取本系统用户信息(需要实现,参考使用示例代码)

  第四部分:精简版、专业版登录的岗位处理逻辑(HOS基础框架版本R2.6.4.3.0及以上需要实现,参考示例代码)

  第五部分:生成Authentication对象并返回(需要实现,必须使用示例代码)


2、supports(Class<?> authentication):必须重写,该方法用于判断是否支持给定类型的认证请求。输入参数authentication是要被验证的对象类型,
通常是UsernamePasswordAuthenticationToken或JwtAuthenticationToken等。该方法返回一个boolean值,表示是否支持该类型的认证请求。
import cn.hutool.json.JSONArray;
import cn.hutool.json.JSONObject;
import cn.hutool.json.JSONUtil;
import com.mediway.hos.security.core.TokenUniqueKey;
import com.mediway.hos.security.core.authentication.AbstractHosAuthenticationToken;
import com.mediway.hos.security.core.userdetails.HosUser;
import com.mediway.hos.security.core.userdetails.HosUserDetails;
import com.mediway.hos.security.core.util.CommonUtils;
import com.mediway.hos.security.core.util.HttpUtils;
import com.mediway.hos.security.core.util.SecurityUtil;
import com.mediway.hos.security.core.util.StringUtil;
import com.mediway.hos.security.enums.BaseBusinessExceptionEnum;
import com.mediway.hos.security.enums.VersionEnum;
import com.mediway.hos.security.login.HosUserDetailsService;
import com.mediway.hos.security.login.authorization.provider.AbstractHosAuthenticationProvider;
import com.mediway.hos.security.login.multiFactor.store.PostStore;
import com.mediway.hos.security.login.service.ConvertPostService;
import com.mediway.hos.security.login.service.SelectUserInfoService;
import com.mediway.hos.security.login.token.HosTokenAuthenticationTokenGenerator;
import com.mediway.hos.security.properties.HosSecurityProperties;
import com.mediway.hos.security.properties.HosVersionProperties;
import lombok.extern.slf4j.Slf4j;
import org.springframework.security.core.Authentication;
import org.springframework.security.core.AuthenticationException;

import java.util.*;

@Slf4j
public class HosFSAuthenticationProvider extends AbstractHosAuthenticationProvider<HosFSAuthenticationToken> {

    private final HosUserDetailsService hosUserDetailsService;
    private final HosFSProperties hosFSProperties;
    private final HosVersionProperties hosVersionProperties;
    private final ConvertPostService convertPostService;

    private final HosTokenAuthenticationTokenGenerator hosTokenAuthenticationTokenGenerator;

    private final PostStore postStore;
    public HosFSAuthenticationProvider(HosTokenAuthenticationTokenGenerator hosTokenAuthenticationTokenGenerator,
                                          HosSecurityProperties hosSecurityProperties,
                                          PostStore postStore,
                                          HosVersionProperties hosVersionProperties,
                                          ConvertPostService convertPostService,
                                          SelectUserInfoService selectUserInfoService,
                                          HosUserDetailsService hosUserDetailsService,
                                          HosFSProperties hosFSProperties) {
        super(null, null, hosTokenAuthenticationTokenGenerator, hosSecurityProperties, postStore, hosVersionProperties, convertPostService, selectUserInfoService);
        this.hosUserDetailsService = hosUserDetailsService;
        this.hosFSProperties = hosFSProperties;
        this.hosVersionProperties = hosVersionProperties;
        this.convertPostService = convertPostService;
        this.hosTokenAuthenticationTokenGenerator = hosTokenAuthenticationTokenGenerator;
        this.postStore = postStore;
    }

    @Override
    public boolean supports(Class<?> authentication) {
        //替换成自定义登陆方式类
        return authentication.isAssignableFrom(HosFSAuthenticationToken.class);
    }

    /**
     * 根据登录参数获取用户信息
     *
     * @param authentication
     * @return
     */
    @Override
    public Authentication authenticate(Authentication authentication) throws AuthenticationException {
        //第一部分:转换成自定义登陆方式类(第二步定义的类)
        HosFSAuthenticationToken fsAuthenticationToken = (HosFSAuthenticationToken) authentication;

        //第二部分:自定义的登录认证逻辑=====开始
        //获取登录传参
        String token=fsAuthenticationToken.getLoginParam().getToken();
        //获取链接、系统标识system-identifier
        if (StringUtil.isBlank(hosFSProperties.getUrl())){
            SecurityUtil.throwError("000099-01","请联系管理员维护验证token接口地址");
        }
        if (StringUtil.isBlank(hosFSProperties.getSystemIdentifier())){
            SecurityUtil.throwError("000099-02","请联系管理员维护系统标识");
        }
        JSONObject param=new JSONObject();
        param.set("token", token);

        Map<String, String> headers=new HashMap<String, String>();
        headers.put("system-identifier", hosFSProperties.getSystemIdentifier());
        String value = HttpUtils.postJson(hosFSProperties.getUrl(),headers, param.toString());
        log.error("FS验证token===接口返回数据: " + value);
        if(CommonUtils.isEmpty(value) || value.trim().startsWith("<")){
            log.error("FS验证token===接口返回数据: " + value);
            SecurityUtil.throwError("000099-03","验证token接口异常");
        }
        JSONObject result = JSONUtil.parseObj(value);
        String personId ="";
        String userCode="";
        if(CommonUtils.equals(result.getStr("code"),"000000")){
            //验证成功,获取登录信息
            JSONObject data =result.getJSONObject("data");
            personId = data.getStr("personId");
            if (StringUtil.isBlank(personId)){
                SecurityUtil.throwError("000099-05","用户名异常");
            }else{
                userCode=personId.split("@")[0];
            }
        }else{
            SecurityUtil.throwError("000099-05",result.getStr("message"));
        }
        //自定义的登录认证逻辑=====结束

        //第三部分:通过登录名获取本系统用户信息
        HosUserDetails hosUserDetails = hosUserDetailsService.loadUserByUsername(userCode);
        TokenUniqueKey tokenUniqueKey = new TokenUniqueKey();
        Map<String, AbstractHosAuthenticationToken> authenticationMap = new HashMap<>();
        authenticationMap.put(fsAuthenticationToken.getClass().getName(), fsAuthenticationToken);
        HosUser hosUser = hosUserDetails.getHosUser();

        //第四部分:精简版、专业版登录的岗位处理逻辑(简版或者登录不需要岗位选择的,忽略该步骤)====开始
        //根据人员获取岗位
        String pId = "";
        if (!SecurityUtil.isAdmin(hosUserDetails.getHosUser().getAccountCode())) {
            pId = hosUserDetails.getHosUser().getPersonId();
        } else {
            pId = "admin";
        }
        JSONObject post = null;
        //如果当前版本不是简版而且传了岗位信息,需要获取对应的岗位,调用接口传了岗位信息,就以传的岗位登录
        if (!CommonUtils.equals(hosVersionProperties.getVersion(), VersionEnum.SIMPLE.getCode())) {
            //getPostByPostInfo(String postUnitType, String postUnitId, String buCode, String postCode, String personId),根据版本需要进行参数传参,没有对应参数传null,默认返回用户的第一个岗位
            //专业版:postUnitType岗位单元类型、postUnitId岗位单元id
            //精简版:buCode业务单元编码、postCode业务岗位编码
            //公共参数personId人员id
            String postStr = convertPostService.getPostByPostInfo(null, null, null, null, pId);
            if (CommonUtils.isEmpty(postStr)) {
                SecurityUtil.throwError(BaseBusinessExceptionEnum.POST_ERROR);
            } else {
                post = JSONUtil.parseObj(postStr, true);
            }

        }

        if (CommonUtils.isNotNull(post)) {
            if (CommonUtils.equals(hosVersionProperties.getVersion(), VersionEnum.PROFESSIONAL.getCode())) {
                JSONArray postRecords = (JSONArray) post.get("postRecords");
                List<String> postSourceIds = new ArrayList<>();
                if (CommonUtils.isNotEmpty(postRecords)) {
                    for (Object postRecord : postRecords) {
                        JSONObject object = (JSONObject) postRecord;
                        String id = object.getStr("postSourceId");
                        if (StringUtil.isNotBlank(id)) {
                            postSourceIds.add(id);
                        }
                    }
                    if (CommonUtils.isNotEmpty(postSourceIds)) {
                        //todo 调用基础平台实现的service,获取岗位id转换信息
                        String postIds = convertPostService.convertPostId(postSourceIds);
                        hosUser.setPostId(postIds);

                        log.info("第一次放入postId---------------------------------");
                    } else {
                        SecurityUtil.throwError(BaseBusinessExceptionEnum.POST_ERROR);
                    }
                    hosUser.setPostName(post.getStr("name"));
                } else {
                    SecurityUtil.throwError(BaseBusinessExceptionEnum.POST_ERROR);
                }
            } else if (CommonUtils.equals(hosVersionProperties.getVersion(), VersionEnum.WROUGHT.getCode())) {
                String postCode = post.getStr("postCode");
                if (StringUtil.isBlank(postCode)) {
                    SecurityUtil.throwError(BaseBusinessExceptionEnum.POST_ERROR);
                } else {
                    //todo 调用基础平台实现的service,获取岗位id转换信息
                    String postIds = convertPostService.convertPostIdByCode(postCode);
                    hosUser.setPostId(postIds);
                    hosUser.setPostName(post.getStr("postName"));
                    log.info("第一次放入postId---------------------------------");
                }
            }
            hosUser.setPostOneVO(post);
        } else {
            hosUser.setAuthVersion(VersionEnum.SIMPLE.getCode());
        }
         //精简版、专业版登录的岗位处理逻辑(简版或者登录不需要岗位选择的,忽略该步骤)===结束

         //第五部分
        return hosTokenAuthenticationTokenGenerator.generate(authenticationMap, hosUserDetails.getHosUser(), tokenUniqueKey);
    }

}
# 第六步,配置类增加扩展登录
如果SecurityLoginConfig类在本工程下,找到该类的securityFilterChain()方法,在该方法新增自定义登录配置,示例如下:
@Bean
@Order(value = Ordered.HIGHEST_PRECEDENCE + 100)
SecurityFilterChain securityFilterChain(HttpSecurity http, HosSecurityProperties hosSecurityProperties, HosPostInfoService hosPostInfoService) throws Exception {

        ...

  // 加载登录配置
  HosLoginConfigurer hosLoginConfigurer = new HosLoginConfigurer();
  // 加载统一认证配置
  if (hosSecurityProperties.getOauth2().isEnable()) {
    hosLoginConfigurer.hosOAuth2Login();
  }
  //以上不允许修改

  // 加载自定义登录配置=====开始
  hosLoginConfigurer.loginTokenEndpoint(loginTokenEndpoint -> {
    //注入自定义登录参数转换类
    loginTokenEndpoint.authenticationConverter(new HosFSAuthenticationConverter());
    //注入自定义用户信息校验类
    loginTokenEndpoint.authenticationProvider(new HosFSAuthenticationProvider(HosConfigurerUtils.getHosTokenAuthenticationTokenGenerator(http),
            HosConfigurerUtils.getHosSecurityProperties(http),
            SpringContextUtils.getBean(PostStore.class),
            SpringContextUtils.getBean(HosVersionProperties.class),
            SpringContextUtils.getBean(ConvertPostService.class),
            SpringContextUtils.getBean(SelectUserInfoService.class),
            SpringContextUtils.getBean(HosUserDetailsService.class),
            SpringContextUtils.getBean(HosFSProperties.class)
    ));
  });
  // 加载自定义登录配置=====结束

  //以下不允许修改
  http.apply(hosLoginConfigurer);

        ...

  return http.build();
}
如果SecurityLoginConfig类定义在引用的jar包里面,新增一个类,添加注解@Configuration, 复制jar包中SecurityLoginConfig类的securityFilterChain()方法, 需要修改方法名、注解order的值修改为value = Ordered.HIGHEST_PRECEDENCE + 90,然后在方法中新增自定义登录配置,示例如下:
package com.mediway.hos;

import cn.hutool.core.collection.CollectionUtil;
import cn.hutool.json.JSONObject;
import cn.hutool.json.JSONUtil;
import com.mediway.hos.app.core.filter.HosAntiAttackFilter;
import com.mediway.hos.app.core.filter.HosCoreFilter;
import com.mediway.hos.app.core.filter.HosPostFilter;
import com.mediway.hos.app.core.filter.HosPostInfoService;
import com.mediway.hos.app.core.property.FrameworkSecurity;
import com.mediway.hos.app.core.util.NoneRequestMatcher;
import com.mediway.hos.common.util.CommonUtils;
import com.mediway.hos.common.util.context.SpringContextUtils;
import com.mediway.hos.common.util.encryption.AesUtil;
import com.mediway.hos.security.core.util.SecurityUtil;
import com.mediway.hos.security.filter.XssFilter;
import com.mediway.hos.security.login.authorization.convert.HosRefreshAuthenticationConverter;
import com.mediway.hos.security.login.authorization.convert.UsernamePasswordAuthenticationConverter;
import com.mediway.hos.security.login.authorization.provider.HosRefreshTokenAuthenticationProvider;
import com.mediway.hos.security.login.configurers.HosConfigurerUtils;
import com.mediway.hos.security.login.configurers.HosLoginConfigurer;
import com.mediway.hos.security.login.store.TokenStore;
import com.mediway.hos.security.properties.HosSecurityProperties;
import lombok.extern.slf4j.Slf4j;
import org.springframework.beans.factory.annotation.Autowired;
import org.springframework.context.annotation.Bean;
import org.springframework.context.annotation.Configuration;
import org.springframework.core.Ordered;
import org.springframework.core.annotation.Order;
import org.springframework.security.config.annotation.web.builders.HttpSecurity;
import org.springframework.security.config.http.SessionCreationPolicy;
import org.springframework.security.web.DefaultSecurityFilterChain;
import org.springframework.security.web.SecurityFilterChain;
import org.springframework.security.web.authentication.rememberme.RememberMeAuthenticationFilter;
import org.springframework.security.web.context.SecurityContextHolderFilter;
import org.springframework.security.web.csrf.CsrfFilter;
import org.springframework.security.web.util.matcher.AntPathRequestMatcher;
import org.springframework.security.web.util.matcher.OrRequestMatcher;
import org.springframework.security.web.util.matcher.RequestMatcher;

import java.util.Collection;
import java.util.List;
import java.util.Objects;
import java.util.stream.Collectors;

@Configuration
@Slf4j
public class HosLoginConfig {
  @Autowired
  private FrameworkSecurity frameworkSecurity;
  // @formatter:off
  @Bean
  @Order(value = Ordered.HIGHEST_PRECEDENCE + 90)
  SecurityFilterChain extendedSecurityFilterChain(HttpSecurity http, HosSecurityProperties hosSecurityProperties, HosPostInfoService hosPostInfoService) throws Exception {
    log.info("开始创建配置类【HosLoginConfig】中 extendedSecurityFilterChain Bean...");

    // 配置白名单
    List<String> whiteList = SecurityUtil.getWhiteList(hosSecurityProperties.getLogin().getWhiteList());
    http
            .authorizeHttpRequests(authorize ->
                    authorize
                            .antMatchers(whiteList.stream().toArray(String[]::new)).permitAll()
                            .requestMatchers(request ->
                                    {
                                      if(CommonUtils.isNotEmpty(request.getHeader("signToken"))){
                                        String data=AesUtil.decryptFormBase64ToString(request.getHeader("signToken"),hosSecurityProperties.getSignKey());
                                        if(CommonUtils.isNotEmpty(data)){
                                          JSONObject obj=JSONUtil.parseObj(data);
                                          if(CommonUtils.equals(obj.getStr("sign"),"OPENAPI")){
                                            return true;
                                          }
                                        }
                                      }
                                      return false;}
                            ).permitAll()
                            .anyRequest().authenticated()
            );
    // 加载登录配置
    HosLoginConfigurer hosLoginConfigurer = new HosLoginConfigurer();
    // 加载统一认证配置
    if (hosSecurityProperties.getOauth2().isEnable()) {
      hosLoginConfigurer.hosOAuth2Login();
    }
    //以上不允许修改

    // 加载自定义登录配置=====开始
    hosLoginConfigurer.loginTokenEndpoint(loginTokenEndpoint -> {
      //注入自定义登录参数转换类
      loginTokenEndpoint.authenticationConverter(new HosFSAuthenticationConverter());
      //注入自定义用户信息校验类
      loginTokenEndpoint.authenticationProvider(new HosFSAuthenticationProvider(HosConfigurerUtils.getHosTokenAuthenticationTokenGenerator(http),
              HosConfigurerUtils.getHosSecurityProperties(http),
              SpringContextUtils.getBean(PostStore.class),
              SpringContextUtils.getBean(HosVersionProperties.class),
              SpringContextUtils.getBean(ConvertPostService.class),
              SpringContextUtils.getBean(SelectUserInfoService.class),
              SpringContextUtils.getBean(HosUserDetailsService.class),
              SpringContextUtils.getBean(HosFSProperties.class)
      ));
    });
    // 加载自定义登录配置=====结束

    //以下不允许修改
    http.apply(hosLoginConfigurer);
    // 安全过滤、岗位token验证过滤器,放在登录成功后
    http.addFilterAfter(new HosCoreFilter(), RememberMeAuthenticationFilter.class);
    http.addFilterBefore(new HosAntiAttackFilter(), SecurityContextHolderFilter.class);
    RequestMatcher ignoreRenewalRequestMatcher;
    List<String> ignoreRenewals = frameworkSecurity.getRenewal().getIgnores();
    if(Objects.nonNull(ignoreRenewals) && !ignoreRenewals.isEmpty()){
      List<RequestMatcher> requestMatchers = ignoreRenewals.stream().map(ignoreRenewal ->new AntPathRequestMatcher(ignoreRenewal, null)).collect(Collectors.toList());
      ignoreRenewalRequestMatcher = new OrRequestMatcher(requestMatchers);
    }else {
      ignoreRenewalRequestMatcher = NoneRequestMatcher.INSTANCE;
    }
    http.addFilterBefore(new HosPostFilter(HosConfigurerUtils.getTokenStore(http), hosPostInfoService, ignoreRenewalRequestMatcher), RememberMeAuthenticationFilter.class);
    http.sessionManagement().sessionCreationPolicy(SessionCreationPolicy.STATELESS);
    //http.csrf(csrf -> csrf.disable());
    http.headers().frameOptions().disable();
    // xss
    if (!frameworkSecurity.getCsrf().isEnable()) {
      http.csrf().disable();
      log.info("配置类【SecurityLoginConfig】CSRF 防护已禁用(csrfEnable=false)");
    }
    if (frameworkSecurity.getCors().isEnable()) {
      http.cors();
      log.info("配置类【SecurityLoginConfig】CORS 配置已启用");
    }
    if (frameworkSecurity.getXss().isEnable()) {
      log.info("配置类【SecurityLoginConfig】XSS 防护已启用");
      // 注册xss过滤器
      XssFilter xssFilter = new XssFilter();
      xssFilter.setEnabled(true);
      List<String> xssExcludes = frameworkSecurity.getXss().getExcludes();
      if (CollectionUtil.isNotEmpty(xssExcludes)) {
        xssFilter.setExcludes(xssExcludes);
        log.debug("XSS 排除路径:{}", formatPaths(xssExcludes));
      }
      http.addFilterAfter(xssFilter, CsrfFilter.class);
      log.debug("XSS 过滤器已注册(顺序:AFTER CsrfFilter)");
    }
    DefaultSecurityFilterChain defaultSecurityFilterChain = http.build();
    log.info("成功创建配置类【SecurityLoginConfig】中实例: {}", defaultSecurityFilterChain.getClass().getName());
    log.debug("  - 过滤器数量: {}", defaultSecurityFilterChain.getFilters().size());
    return defaultSecurityFilterChain;
  }
  // 辅助方法
  private String formatPaths(Collection<String> paths) {
    return paths.stream()
            .map(path -> "\"" + path + "\"")
            .collect(Collectors.joining(", "));
  }
}
# 第七步,测试
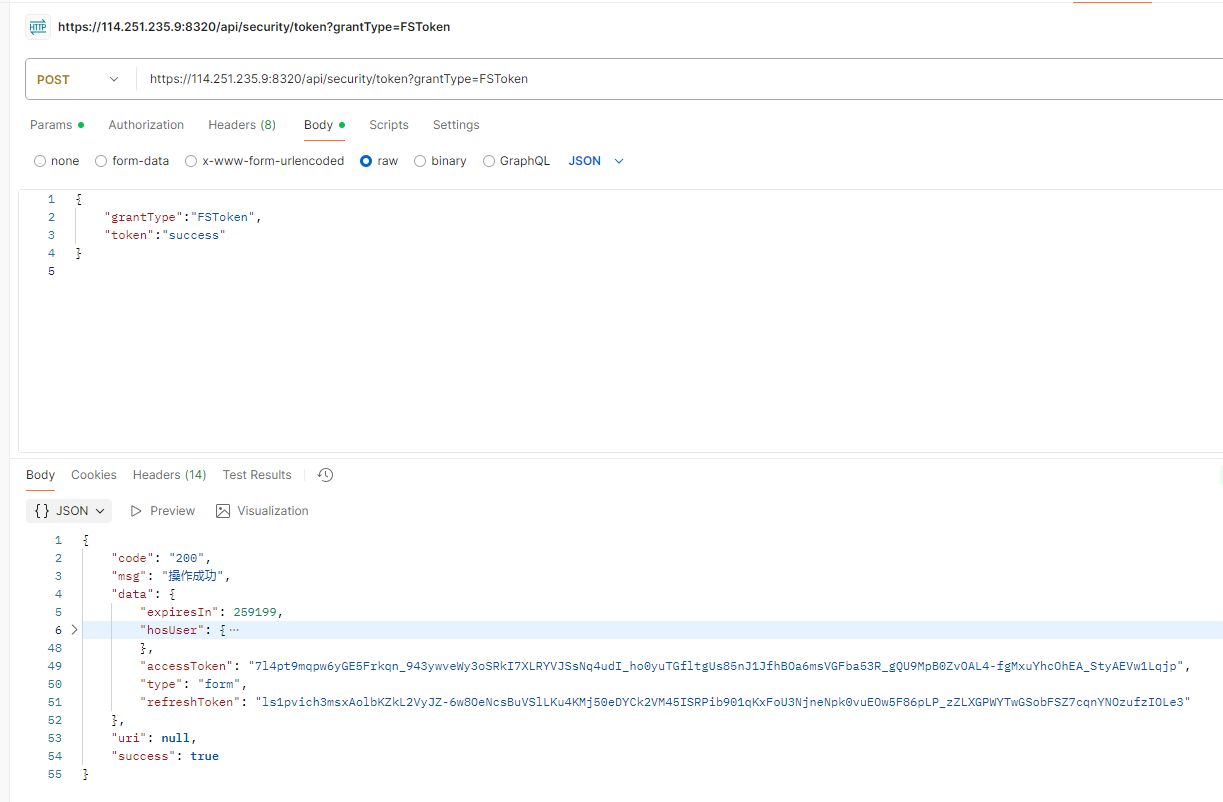
启用后端服务器,调用登录接口/api/security/token?grantType=xxx。
参数说明:query中grantType等于第二步自定义登录方式类中HosGrantType的值,body数据为第一步自定义参数的值。